반응형
인터셉터 (Interceptor) 란 ?
: Interceptor란 FIlter와 매우 유사한 형태로 존재하지만, 차이점은 Spring Context에 등록된다.
주로 인증 단계를 처리하거나, 로깅(Logging)을 하는데 사용한다. 이를 선/후 처리함으로써, business logic과 분리시킨다.
→ Interceptor를 구현하려면 HandlerInterceptor 인터페이스를 구현하는 클래스를 만들어야 한다.
1. preHandle() : 컨트롤러가 실행되기 전에 호출되는 메서드, 이 메서드는 요청을 가로채서 필요한 작업을 수행한 후 요청 처리가 계속되어야 하는지 여부를 결정한다. (true이면 요청 처리 O, false이면 요청 처리X)
2. postHandle() : 컨트롤러 실행 후 호출되지만, 뷰(View)가 렌더링되기 전에 호출하는 메서드, 컨트롤러가 요청을 처리한 후에 필요한 후 처리 작업을 수행하는데 사용된다.
3. afterCompletion() : 요청 처리가 완료된 후, 뷰 렌더링이 완료된 후에 호출되는 메서드, 자원을 정리하거나 추가 로깅 등의 작업을 수행하는데 사용된다.
→ 인터셉터를 구현한 후에는 WebMvcConfigurer 인터페이스를 구현하는 구성 클래스를 작성하여 인터셉터를 등록해야 한다. 그리고 addInterceptor() 메서드를 오버라이드 하여 인터셉터 인스턴스를 등록할 수 있다.
인터셉터 구현 순서
1. HandlerInterceptor를 구현한 클래스를 정의한다.
→ @Component : preHandle() 메서드, postHandle() 메서드, afterCompletion() 메서드

2. WebMvcConfigurer 인터페이스를 구현한 클래스를 정의하고 1번에서 만든 클래스를 등록해줘야 한다.
→ @Configuration : addInterceptors() 메서드
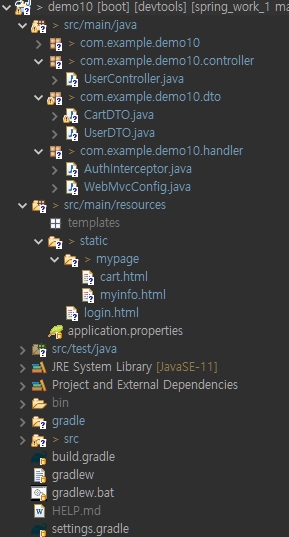
- 프로젝트 생성 후 controller, handler 패키지 생성하기.
- src/main/resources → static 폴더 아래 login.html 파일 생성하기.
- src/main/resources → static 아래 mypage폴더 생성하기.
- mypage폴더 안에 cart.html, myinfo.html 생성하기.
- controller login-page 주소 설계
- Interceptor 클래스에서 세션 불러와서 인증된 사용자인지 확인하는 로직 짜기.
- WebMvcConfigure 에서 addInterceptor() 해주기 ( sendRedirection 오류 때문에 .addPathPatterns(””) 사용하여 경로를 지정해줘서 mypage아래에 있는 것만 가로채기. )
- controller myinfo 주소 설계
- login.html 만들기
- login-proc 주소설계 후 session에 저장된 값 가져오도록 하고 redirect 경로를 /mypage로 주어 WebMvcConfig.java로 AuthInterceptor.java를 통해 인증 정보 확인을 하고 myinfo.html로 들어감.
인터셉터 구현 예제
UserController.java
1 2 3 4 5 6 7 8 9 10 11 12 13 14 15 16 17 18 19 20 21 22 23 24 25 26 | @Controller public class UserController { // 아무나 다 들어올 수 있도록 @GetMapping("/login-page") public String login() { return "login.html"; } @GetMapping("/mypage/myinfo") public String myinfo() { return "mypage/myinfo.html"; } @PostMapping("/login-proc") public String loginProc(HttpServletRequest request, HttpServletResponse response, UserDTO user) { HttpSession session = request.getSession(); session.setAttribute("user", user); System.out.println("user : " + user); return "redirect:/mypage/myinfo.html"; } } | cs |
UserDTO.java
1 2 3 4 5 6 7 8 9 10 11 12 | package com.example.demo10.dto; import lombok.Data; @Data public class UserDTO { private String username; private String password; } | cs |
AuthInterceptor.java
1 2 3 4 5 6 7 8 9 10 11 12 13 14 15 16 17 18 19 20 21 22 23 24 25 26 27 28 29 30 31 32 33 | package com.example.demo10.handler; import javax.servlet.http.HttpServletRequest; import javax.servlet.http.HttpServletResponse; import javax.servlet.http.HttpSession; import org.springframework.stereotype.Component; import org.springframework.web.servlet.HandlerInterceptor; @Component // IoC 대상 public class AuthInterceptor implements HandlerInterceptor{ //myInfo 이동시 세션 여부 확인 (controller 들어가기 전에 가로채기) @Override public boolean preHandle(HttpServletRequest request, HttpServletResponse response, Object handler) throws Exception { HttpSession session = request.getSession(); // 사용자가 로그인을 하면 세션 메모리 영역에 user 키-값 구조로 저장 처리할 예정 Object user = session.getAttribute("user"); System.out.println(user); System.out.println("preHandler 동작 확인"); if(user == null) { response.sendRedirect("/login-page"); return false; } return true; } } | cs |
WebMvcConfig.java
1 2 3 4 5 6 7 8 9 10 11 12 13 14 15 16 17 18 19 20 21 22 23 24 25 26 27 | package com.example.demo10.handler; import org.springframework.beans.factory.annotation.Autowired; import org.springframework.context.annotation.Configuration; import org.springframework.web.servlet.config.annotation.InterceptorRegistry; import org.springframework.web.servlet.config.annotation.WebMvcConfigurer; @Configuration public class WebMvcConfig implements WebMvcConfigurer{ @Autowired private AuthInterceptor authInterceptor; @Override public void addInterceptors(InterceptorRegistry registry) { // 야 authInterceptor 동작시킬 때 모든 페이지를 // 너가 가로채면 무조건 리다이렉트 되잖아. // 그게 아니라 내가 명시하는 요청 설계 주소에서만 동작하도록 일해 // localhost:8080/hello <-- 인터셉터 동작하지 않음. // localhost:8080/mypage/myinfo <-- 인터셉터 동작함. registry.addInterceptor(authInterceptor) .addPathPatterns("/mypage/**"); // mypage 아래에 있는 것만 가로채 } } | cs |
login.html
1 2 3 4 5 6 7 8 9 10 11 12 13 14 15 16 17 | <!DOCTYPE html> <html> <head> <meta charset="UTF-8"> <title>Insert title here</title> </head> <body> <h1>로그인 페이지</h1> <form action="/login-proc" method="post"> <input type="text" name="username" value="tenco"> <br> <input type="password" name="password" value="1234"> <input type="submit" value="로그인"> </form> </body> </html> | cs |
myinfo.html
1 2 3 4 5 6 7 8 9 10 11 | <!DOCTYPE html> <html> <head> <meta charset="UTF-8"> <title>Insert title here</title> </head> <body> <h1>myinfo 페이지</h1> <h2>여기는 인증된 사용자만 페이지를 볼 수 있도록 처리</h2> </body> </html> | cs |
반응형
'프로그래밍 > Spring Boot' 카테고리의 다른 글
| Spring Boot_MyBatis 설정 (0) | 2023.04.18 |
|---|---|
| Spring Boot_H2 DB 초기 설정 (0) | 2023.04.18 |
| Spring Boot_필터(Filter) (0) | 2023.04.13 |
| Spring Boot_예외 처리 (0) | 2023.04.13 |
| Spring Boot_유효성 검사(Validation) (0) | 2023.04.13 |

