반응형
JSON(JavaScript Object Notaion)이란
경량의 데이터 교환 형식으로, 키-값 쌍 또는 배열 형태의 데이터를 텍스트 형식으로 표현한다.
특정한 구조(약속)가 있는 문자열을 JSON이라고 한다.
- JSON 형식 예시
{
  "name": "John",
  "age": 30,
  "city": "New York",
  "languages": ["English", "French", "Spanish"],
  "friends": [
    {"name": "Mary", "age": 28},
    {"name": "Peter", "age": 32},
    {"name": "Lisa", "age": 27}
  ]
}

{} <-- 객체
[] <-- 배열(리스트)- 문자열(string) - 큰따옴표("")로 묶인 유니코드 문자열입니다.
- 숫자(number) - 정수, 실수 등의 수치 데이터를 나타냅니다.
- 불리언(boolean) - 참(True) 또는 거짓(False) 값을 가지는 데이터입니다.
- null - 값이 없음을 나타내는 데이터입니다.
- 객체(object) - 중괄호({})로 묶인 키-값 쌍들의 집합으로, 각 키-값 쌍은 콜론(:)으로 구분됩니다.
- 배열(array) - 대괄호([])로 묶인 값들의 리스트로, 각 값은 쉼표(,)로 구분됩니다.
- Json 가상데이터 http 통신 예제
1 2 3 4 5 6 7 8 9 10 11 12 13 14 15 16 17 18 19 20 21 22 23 24 25 26 27 28 29 30 31 32 33 34 35 36 37 38 39 40 41 42 43 44 45 46 47 48 49 50 51 52 53 54 55 56 57 58 59 60 61 62 | package ch01; import java.io.BufferedReader; import java.io.IOException; import java.io.InputStreamReader; import java.net.HttpURLConnection; import java.net.MalformedURLException; import java.net.URL; import com.google.gson.Gson; public class MainTest2_todos_100 { public static void main(String[] args) { try { // http로 통신을 하기 위해 URL 클래스를 이용하여 가져올 가상데이터의 주소를 넣어준다. // 그 다음 HttpURLConnection을 이용하여 url과 연결해준다. URL url = new URL("https://jsonplaceholder.typicode.com/todos/100"); // 100번째 id 출력 HttpURLConnection conn = (HttpURLConnection) url.openConnection(); // http 요청 --> 2가지 방식 (GET, POST) conn.setRequestMethod("GET"); conn.connect(); // 스트림이 연결됨 int statusCode = conn.getResponseCode(); // System.out.println(statusCode); // 200 : 통신 O / 404 : 통신X 요청 URL이 없다. if (statusCode == 200) { // conn 사용 // 내용을 읽어오기 위한 입력 스트림 // 기반 스트림 + 보조 스트림 : 데코레이션 패턴 BufferedReader reader = new BufferedReader(new InputStreamReader(conn.getInputStream())); String line = null; StringBuffer sb = new StringBuffer(); while ((line = reader.readLine()) != null) { sb.append(line); } // System.out.println(sb.toString()); // JSON Parsing 해보기 -> 문자열 --> Java Object 변환 String str = sb.toString(); Gson gson = new Gson(); Todo todo = gson.fromJson(str, Todo.class); // runtime시점에 생성 System.out.println("id : " + todo.getId()); System.out.println("userId : " + todo.getUserId()); System.out.println("title : " + todo.getTitle()); System.out.println("completed : " + todo.isCompleted()); } } catch (MalformedURLException e) { e.printStackTrace(); } catch (IOException e) { e.printStackTrace(); } } // end of main } | cs |
→ 가상데이터 JSONPlaceholder를 사용하여 콘솔에 데이터를 출력하는 예제이다.
<결과 화면>

- JsonArray와 JsonObject 사용해서 Json구문 만들기
<예상 결과 화면>
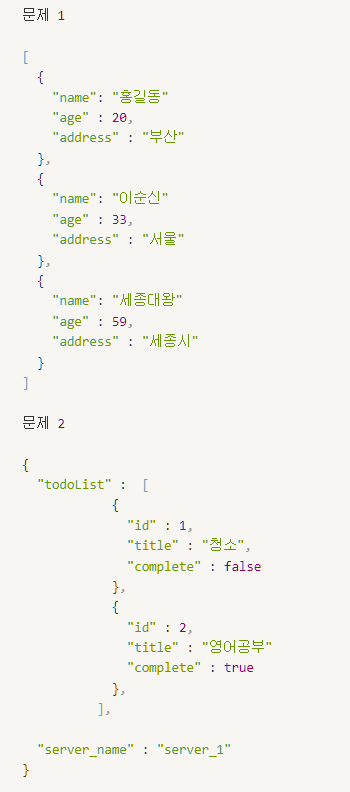
1 2 3 4 5 6 7 8 9 10 11 12 13 14 15 16 17 18 19 20 21 22 23 24 25 26 27 28 29 30 31 32 33 34 35 36 37 38 39 40 41 42 43 44 45 46 47 48 49 50 51 52 53 54 55 56 57 58 59 60 61 | package ch02; import com.google.gson.JsonArray; import com.google.gson.JsonObject; public class JsonMainTest4 { public static void main(String[] args) { // 문제1 JsonArray jsonArray1 = new JsonArray(); JsonObject jsonObject1 = new JsonObject(); JsonObject jsonObject2 = new JsonObject(); JsonObject jsonObject3 = new JsonObject(); jsonObject1.addProperty("name", "홍길동"); jsonObject1.addProperty("age", 20); jsonObject1.addProperty("address", "부산"); jsonObject2.addProperty("name", "이순신"); jsonObject2.addProperty("age", 33); jsonObject2.addProperty("address", "서울"); jsonObject3.addProperty("name", "세종대왕"); jsonObject3.addProperty("age", 59); jsonObject3.addProperty("address", "세종시"); jsonArray1.add(jsonObject1); jsonArray1.add(jsonObject2); jsonArray1.add(jsonObject3); System.out.println(jsonArray1); System.out.println("==========================="); // 문제2 JsonObject jsonObject4 = new JsonObject(); JsonObject jsonObject5 = new JsonObject(); JsonObject jsonObject6 = new JsonObject(); jsonObject5.addProperty("id", 1); jsonObject5.addProperty("title", "청소"); jsonObject5.addProperty("complete", false); jsonObject6.addProperty("id", 2); jsonObject6.addProperty("title", "영어공부"); jsonObject6.addProperty("complete", true); JsonArray jsonArray2 = new JsonArray(); jsonArray2.add(jsonObject5); jsonArray2.add(jsonObject6); jsonObject4.add("todoList", jsonArray2); JsonArray jsonArray3 = new JsonArray(); jsonArray3.add(jsonObject5); jsonObject4.addProperty("server_name", "server_1"); System.out.println(jsonObject4); } // end of main } | cs |
→ JsonObject 객체 안에 내용을 넣으려면 .addProperty("키", "값")를 사용하여 넣어줘야 한다.
→ JsonArray안에 jsonObject를 넣고싶다면 .add() 메서드를 사용하여 넣어주면 된다.
<결과 화면>

- Type 클래스를 이용한 Json 가상데이터 http 통신
User 클래스
1 2 3 4 5 6 7 8 9 10 11 12 13 14 15 16 17 18 19 20 21 22 23 24 25 26 27 28 29 30 31 32 33 34 35 36 37 38 39 40 41 42 43 44 45 46 47 48 49 50 51 52 53 54 55 56 57 58 59 60 61 62 63 64 65 66 67 68 69 70 71 72 73 74 75 76 77 78 79 80 81 82 83 84 | package ch03; public class User { private int id; private String name; private String username; private String email; private Address address; private String phone; private String website; private Company company; @Override public String toString() { return "User [id=" + id + ", name=" + name + ", username=" + username + ", email=" + email + ", address=" + address + ", phone=" + phone + ", website=" + website + ", company=" + company + "]"; } public Integer getId() { return id; } public void setId(Integer id) { this.id = id; } public String getName() { return name; } public void setName(String name) { this.name = name; } public String getUsername() { return username; } public void setUsername(String username) { this.username = username; } public String getEmail() { return email; } public void setEmail(String email) { this.email = email; } public Address getAddress() { return address; } public void setAddress(Address address) { this.address = address; } public String getPhone() { return phone; } public void setPhone(String phone) { this.phone = phone; } public String getWebsite() { return website; } public void setWebsite(String website) { this.website = website; } public Company getCompany() { return company; } public void setCompany(Company company) { this.company = company; } } | cs |
→ 포함관계를 이용하여 User클래스를 이용해 출력이 되도록 함.
Address 클래스
1 2 3 4 5 6 7 8 9 10 11 12 13 14 15 16 17 18 19 20 21 22 23 24 25 26 27 28 29 30 31 32 33 34 35 36 37 38 39 40 41 42 43 44 45 46 47 48 49 50 51 52 53 54 55 56 57 | package ch03; public class Address { private String street; private String suite; private String city; private String zipcode; private Geo geo; @Override public String toString() { return "Address [street=" + street + ", suite=" + suite + ", city=" + city + ", zipcode=" + zipcode + ", geo=" + geo + "]"; } public String getStreet() { return street; } public void setStreet(String street) { this.street = street; } public String getSuite() { return suite; } public void setSuite(String suite) { this.suite = suite; } public String getCity() { return city; } public void setCity(String city) { this.city = city; } public String getZipcode() { return zipcode; } public void setZipcode(String zipcode) { this.zipcode = zipcode; } public Geo getGeo() { return geo; } public void setGeo(Geo geo) { this.geo = geo; } } | cs |
Company 클래스
1 2 3 4 5 6 7 8 9 10 11 12 13 14 15 16 17 18 19 20 21 22 23 24 25 26 27 28 29 30 31 32 33 34 35 36 37 38 | package ch03; public class Company { private String name; private String catchPhrase; private String bs; @Override public String toString() { return "Company [name=" + name + ", catchPhrase=" + catchPhrase + ", bs=" + bs + "]"; } public String getName() { return name; } public void setName(String name) { this.name = name; } public String getCatchPhrase() { return catchPhrase; } public void setCatchPhrase(String catchPhrase) { this.catchPhrase = catchPhrase; } public String getBs() { return bs; } public void setBs(String bs) { this.bs = bs; } } | cs |
Geo 클래스
1 2 3 4 5 6 7 8 9 10 11 12 13 14 15 16 17 18 19 20 21 22 23 24 25 26 27 28 29 | package ch03; public class Geo { private String lat; private String lng; @Override public String toString() { return "Geo [lat=" + lat + ", lng=" + lng + "]"; } public String getLat() { return lat; } public void setLat(String lat) { this.lat = lat; } public String getLng() { return lng; } public void setLng(String lng) { this.lng = lng; } } | cs |
→ Address 클래스에 포함되어 있다.
MainTest 클래스
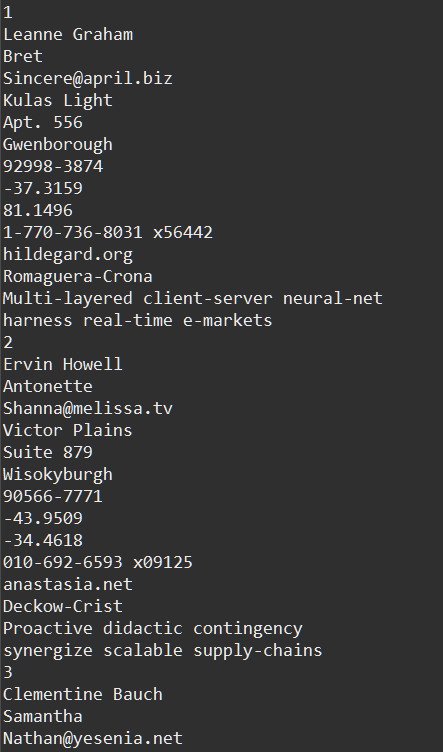
1 2 3 4 5 6 7 8 9 10 11 12 13 14 15 16 17 18 19 20 21 22 23 24 25 26 27 28 29 30 31 32 33 34 35 36 37 38 39 40 41 42 43 44 45 46 47 48 49 50 51 52 53 54 55 56 57 58 59 60 61 62 63 64 65 66 67 68 69 70 71 72 73 74 75 76 77 78 | package ch03; import java.io.BufferedReader; import java.io.IOException; import java.io.InputStreamReader; import java.lang.reflect.Type; import java.net.HttpURLConnection; import java.net.MalformedURLException; import java.net.URL; import java.util.ArrayList; import java.util.List; import com.google.gson.Gson; import com.google.gson.reflect.TypeToken; public class MainTest5_user { public static void main(String[] args) { try { URL url = new URL("https://jsonplaceholder.typicode.com/users"); HttpURLConnection conn = (HttpURLConnection) url.openConnection(); conn.setRequestMethod("GET"); conn.connect(); int statusCode = conn.getResponseCode(); if (statusCode == 200) { BufferedReader reader = new BufferedReader(new InputStreamReader(conn.getInputStream())); String line = null; StringBuffer sb = new StringBuffer(); while ((line = reader.readLine()) != null) { sb.append(line); } String result = sb.toString(); Gson gson = new Gson(); Type listType = new TypeToken<List<User>>() { }.getType(); ArrayList<User> userList = gson.fromJson(result, listType); // System.out.println(userList.toString()); for (User user : userList) { System.out.println(user.getId()); System.out.println(user.getName()); System.out.println(user.getUsername()); System.out.println(user.getEmail()); System.out.println(user.getAddress().getStreet()); System.out.println(user.getAddress().getSuite()); System.out.println(user.getAddress().getCity()); System.out.println(user.getAddress().getZipcode()); System.out.println(user.getAddress().getGeo().getLat()); System.out.println(user.getAddress().getGeo().getLng()); System.out.println(user.getPhone()); System.out.println(user.getWebsite()); System.out.println(user.getCompany().getName()); System.out.println(user.getCompany().getCatchPhrase()); System.out.println(user.getCompany().getBs()); } } } catch (MalformedURLException e) { e.printStackTrace(); } catch (IOException e) { e.printStackTrace(); } } // end of main } | cs |
→ Type 클래스를 이용해 컴파일 시점에 데이터를 불러오도록 하고 전체 데이터를 불러오기 위해 List인터페이스를 사용하였다.
<결과 화면>
반응형

